
Customer.io
Connect Customer.io to JustAI to run AI-optimized copy experiments in your existing campaigns. JustAI serves the best content variant to each recipient at send time and learns from opens, clicks, and conversions.
How it works
Section titled “How it works”- A Webhook Action in your Customer.io campaign asks JustAI for content for each recipient.
- JustAI’s response is stored as an attribute on the customer profile or the journey run.
- Your message renders that content with Liquid, so each recipient sees the variant JustAI picked for them.
- Customer.io reporting events (sends, opens, clicks, conversions) flow back to JustAI, so it learns which variants win.
Before you start
Section titled “Before you start”- Confirm which Customer.io workspace (Production vs other) you’re connecting.
- Your JustAI org slug — usually your company name in lowercase (ask us if you’re not sure).
- Make sure you have permissions to create API credentials and webhooks in Customer.io.
Connect Customer.io to JustAI
Section titled “Connect Customer.io to JustAI”This is one-time setup — all templates will share this configuration. Once it’s done, JustAI receives the reporting events it needs to measure performance (send/open/click/conversion) and power downstream workflows.
Step 1 — Create a Customer.io API key
Section titled “Step 1 — Create a Customer.io API key”Create an App API key in your Customer.io workspace:
- Navigate to
Workspace settings→API and Webhook Credentials→App API Keys. - Suggested values:
- Name:
JustAI - Workspace:
Production(or your chosen workspace)
- Name:

Step 2 — Save the Customer.io key in JustAI
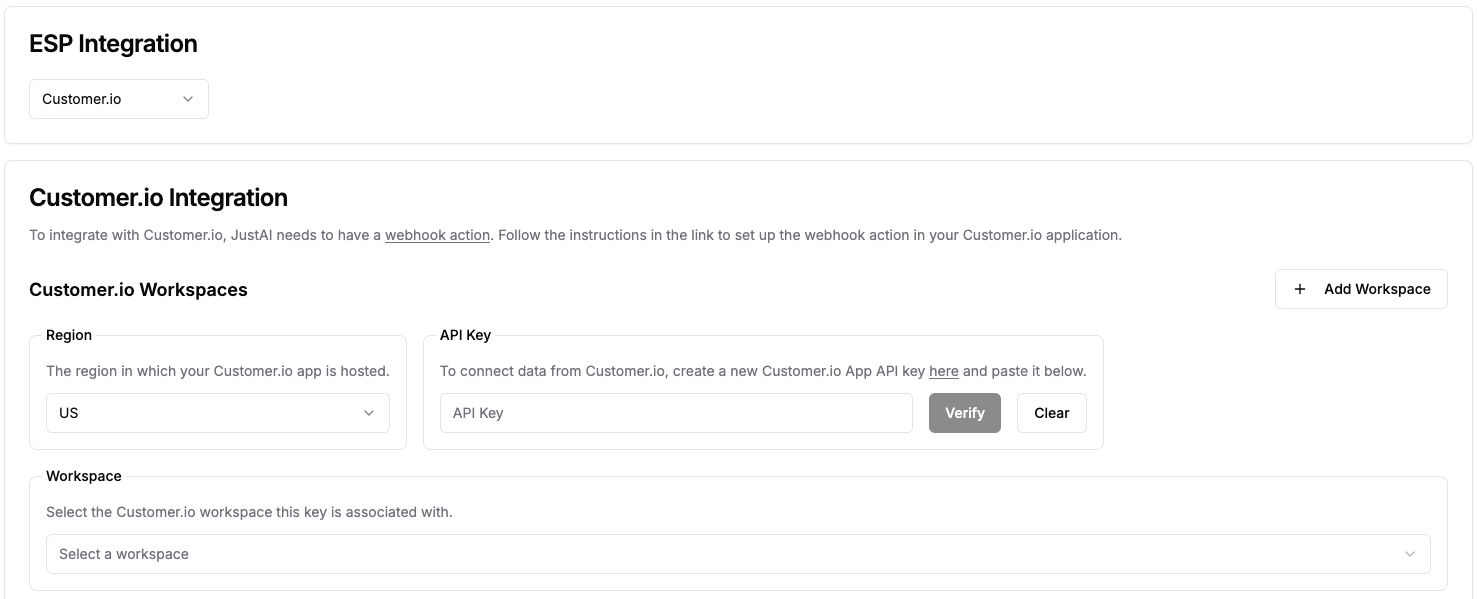
Section titled “Step 2 — Save the Customer.io key in JustAI”In the JustAI console:
- Open Org Integration Settings.
- Select
Customer.ioas the ESP integration. - Choose the appropriate workspace (for example,
Production). - Paste the Customer.io API key and save changes.
Step 3 — Create a JustAI API key
Section titled “Step 3 — Create a JustAI API key”Store the key in a password manager. You’ll use this later for the Customer.io Webhook Action calls in your campaigns.
Step 4 — Send campaign events to JustAI
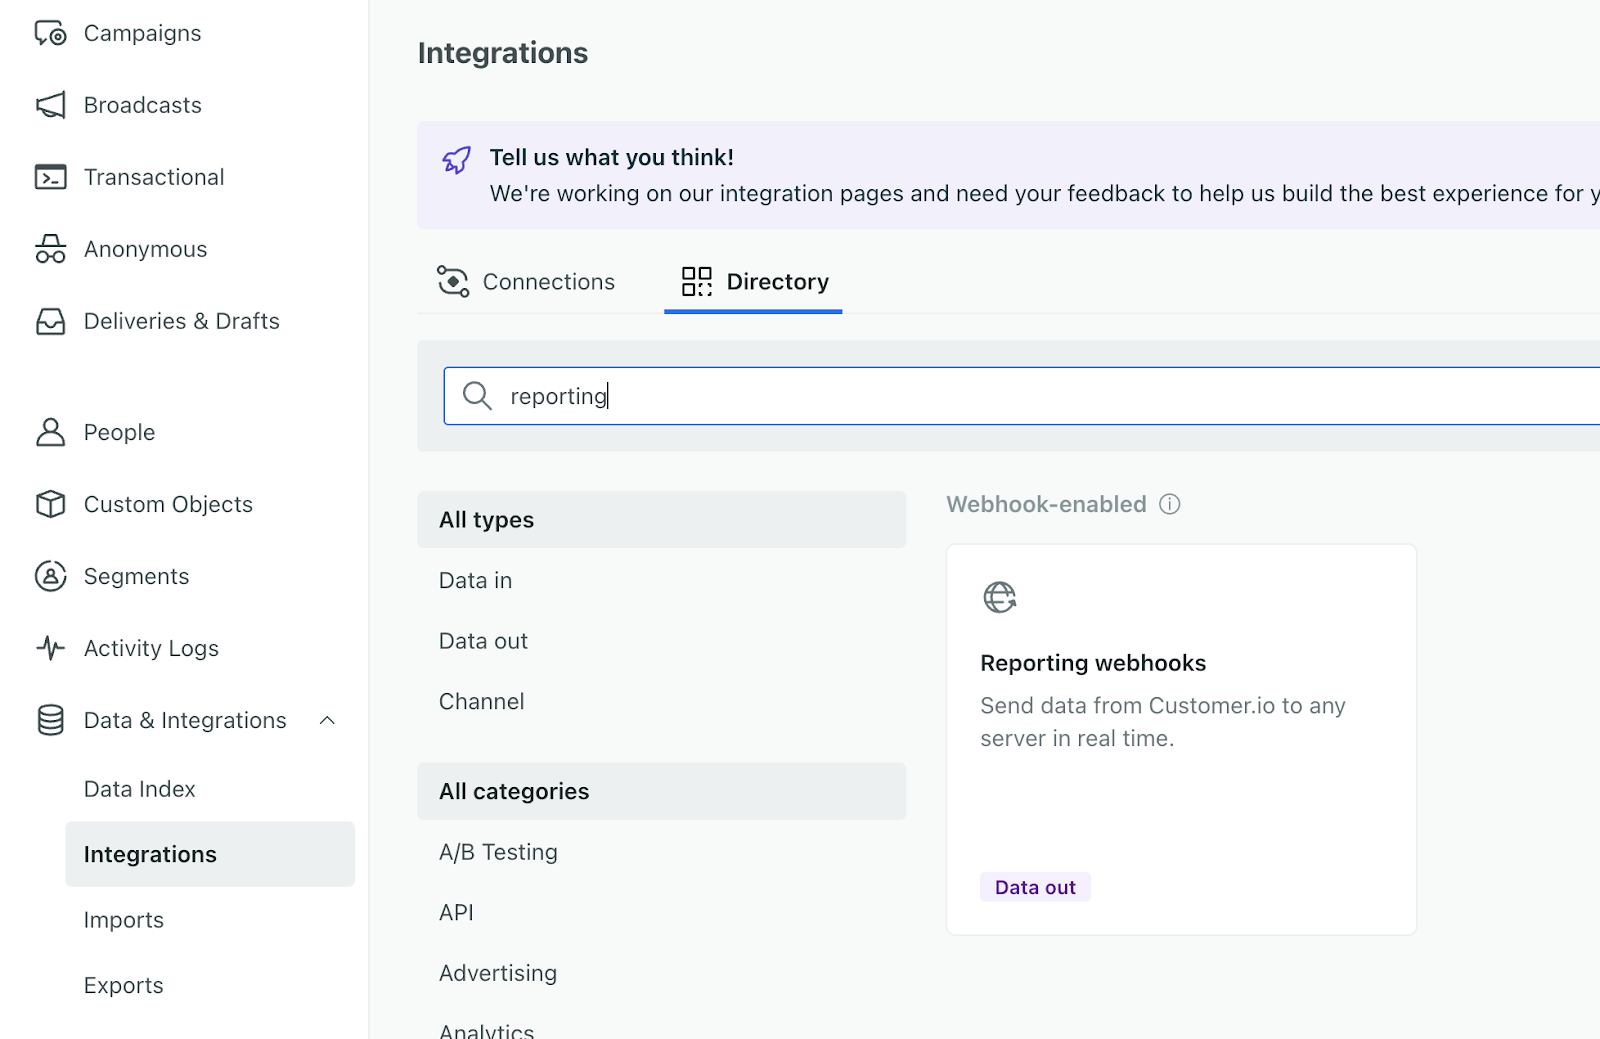
Section titled “Step 4 — Send campaign events to JustAI”Create a Reporting Webhook in Customer.io so campaign events flow back to JustAI:
- Go to
Data & Integrations→Integrations→Add Integration→Reporting Webhook. - Fill out the form:
- Webhook Name:
JustAI - Endpoint:
https://worker.justwords.ai/api/webhook/cio/<org_slug>- Replace
<org_slug>with your org’s name.
- Replace
- Events: select the events you want JustAI to receive (start with send/open/click/conversion).
- Options:
Send only the first time the event occurs.
- Webhook Name:
- Press
SaveandEnable Webhook.
Set up a template
Section titled “Set up a template”Follow these steps for each campaign you want to optimize with JustAI.
- In Customer.io, open the campaign workflow and set up your control/treatment split — control is your existing message, treatment is the JustAI-optimized version:
- Control: existing message.
- Treatment: a Webhook Action followed by the JustAI message.
- Configure the Webhook Action request:
- Method:
POST - URL:
https://worker.justwords.ai/api/generate/<org_slug> - Headers:
X-Api-Key: <JUSTAI_API_KEY>Content-Type: application/json
- Body: use the payload recommended in JustAI (Template → Integration Settings → Customer.io).
- Method:
- Configure the Response tab:
- Attribute name:
jw_<template_id> - Value:
{{ response.copy | json }} - Source: choose customer attribute or journey trigger data depending on your attribute scope (see Attribute scope below).
- Attribute name:
- In JustAI, open the template Integration Settings and set:
- Campaign ID
- Webhook Action ID (and Control Action ID if you use multiple controls)
- Attribute Scope (if enabled — see below)
- Save changes, then reference the stored data in your Customer.io message using the appropriate Liquid prefix:
- Customer attributes:
{{ customer.jw_<template_id>.vars.<var_name> }} - Journey attributes:
{{ journey.jw_<template_id>.vars.<var_name> }}
- Customer attributes:
For email templates with an HTML body variable, the body is the exception — JustAI writes it into the Customer.io email for you rather than returning it in the webhook response. See Large HTML emails.
Attribute scope
Section titled “Attribute scope”When the JustAI webhook returns a response, Customer.io stores it as an attribute that you reference in your message Liquid. There are two places this data can live:
| Scope | Liquid prefix | Stored on | Best for |
|---|---|---|---|
| Customer attributes | customer.jw_* | The customer profile | Simple setups, data needed across multiple journeys |
| Journey attributes | journey.jw_* | The current journey run | Most setups — avoids bloating the customer profile with per-template data |
Journey attributes are scoped to a single journey execution and are automatically cleaned up. Customer attributes persist on the profile indefinitely. For most use cases, journey attributes are recommended to keep customer profiles lean.
For more details, see the Customer.io docs on journey attributes and the journey attributes release notes.
Configuring attribute scope
Section titled “Configuring attribute scope”Per account (default): In JustAI, go to Org Integration Settings and set the Default Attribute Scope on your Customer.io workspace. All new templates will inherit this default.
Per template (override): In the template’s Integration Settings, the Attribute Scope selector lets you override the account default. This is useful when migrating — existing templates can stay on customer while new ones use journey.
Webhook response setup
Section titled “Webhook response setup”The webhook response configuration in Customer.io differs slightly depending on the scope:
- Customer attributes: In the Response tab, click “Set up an attribute”, choose the attribute name, and enter
jw_<template_id>. - Journey attributes: In the Response tab, click “Set up an attribute”, choose journey trigger data as the source, and enter
jw_<template_id>.
Large HTML emails
Section titled “Large HTML emails”Customer.io limits how much data it will store from a webhook response (the cap was 10KB historically and is now 100KB). A full HTML email body routinely exceeds that, so JustAI does not send the HTML back in the webhook response for email templates.
Instead, JustAI writes the HTML into the Customer.io email itself and returns only the ID of the variant it picked, so the email body no longer counts toward the response size cap. Everything else you send back still does — another large HTML or json variable, or "trace": true left in the webhook body, can still push the response over the limit. See Troubleshooting if you hit it.
How JustAI handles it
Section titled “How JustAI handles it”- The webhook response stays small. JustAI drops the
bodyvariable from the response. What comes back iscopy.id— the ID of the variant chosen for this recipient — plus your small variables (subject,preheader, and so on). - JustAI syncs the HTML into Customer.io. Whenever you save, roll out, or ship the template, JustAI updates the Customer.io email over the API so its body is a Liquid conditional covering every active and control variant.
- Customer.io renders the matching branch at send time. The conditional is keyed on the variant ID stored by the webhook, so each recipient gets the variant JustAI selected.
The synced body looks like this (using customer. or journey. to match your attribute scope):
{% if customer.jw_123.id == "8f2c…" %}Ready to upgrade?{% elsif customer.jw_123.id == "b41a…" %}Your upgrade is waiting{% else %}Upgrade today{% endif %}Only the parts that actually differ between variants get wrapped in a conditional. JustAI diffs the variant bodies, keeps the shared markup once, and minifies whitespace — so the email doesn’t grow by a full copy for every variant you add.
The most-default variant becomes the plain {% else %} branch. If the webhook fails or no variant ID is stored, Customer.io still renders that branch rather than sending a blank email.
subject and preheader are small, so they keep coming through the response — with a hard-coded fallback in case one is missing:
{% if customer.jw_123.vars.subject %}{{ customer.jw_123.vars.subject }}{% else %}Upgrade today{% endif %}Only the variable named body is handled this way. Other HTML variables still come back in the response and render with the raw filter:
{% if customer.jw_123.vars.hero %}{{ customer.jw_123.vars.hero | raw }}{% else %}<h1>Upgrade today</h1>{% endif %}Keep those lean — they still count toward the response size cap.
Requirements
Section titled “Requirements”JustAI omits body from the webhook response when the first two conditions below are true. To write that body into Customer.io instead, the integration must satisfy all three:
- The template type is email.
- The template has a variable named
bodywith type HTML. - The template’s Integration Settings have either a Treatment Action ID or a Design Studio Email ID set.
If the treatment email was built in Customer.io’s Design Studio, turn on Enable Design Studio in Integration Settings and select the email — Design Studio emails can’t be updated through the campaigns API, so JustAI needs the email ID to sync.
Personalization
Section titled “Personalization”The default webhook body works for basic setups. For personalization, pass additional user attributes to JustAI using the attrs field in the request body. JustAI can auto-sync these attributes to keep your personalization data up to date.
Basic syntax
Section titled “Basic syntax”Add an attrs object to your webhook body:
{ "attrs": { "<attribute_name>": "{{ customer.<field_name> }}" }}For example, to pass a user’s persona:
{ "attrs": { "persona": "{{ customer.persona }}" }}Multiple attributes
Section titled “Multiple attributes”Pass multiple attributes in a single request:
{ "attrs": { "persona": "{{ customer.persona }}", "plan": "{{ customer.plan_type }}", "city": "{{ customer.city }}" }}Handling missing values
Section titled “Handling missing values”Use Liquid conditionals to provide default values when attributes might be missing:
{% if customer.plan_type %}{{ customer.plan_type }}{% else %}free{% endif %}Referencing objects
Section titled “Referencing objects”Anything referenceable in Customer.io Liquid is available. You can reference nested objects, arrays, and relationships:
{{ customer.company.name }}- nested object property.{{ customer.tags | first }}- first item in an array.{{ customer.subscription.status }}- related object property.
Event attributes
Section titled “Event attributes”For event-triggered campaigns, event data is accessible via {{ event.<field> }}:
{ "attrs": { "product_category": "{{ event.product_category }}", "order_value": "{{ event.order_value }}" }}Full example
Section titled “Full example”A complete webhook body with required fields and custom attributes:
{ "template_id": "<template_id>", "user_id": "{{ customer.id }}", "tracking_id": "{{ message.journey_id }}", "attrs": { "persona": "{{ customer.persona }}", "plan": "{% if customer.plan_type %}{{ customer.plan_type }}{% else %}free{% endif %}", "company_name": "{{ customer.company.name }}" }}Fields vs attrs
Section titled “Fields vs attrs”JustAI supports two ways to pass user data: attrs and fields.
| Parameter | Purpose | Use When |
|---|---|---|
attrs | Attributes used for ranking and filtering variants | You want JustAI to select different content based on user segments (e.g., persona, plan type). |
fields | Personalization fields returned as hydrated strings | You need to insert user-specific values (e.g., first name) into the generated content without affecting variant selection. |
Use fields for simple personalization like names or account details:
{ "fields": { "first_name": "{{ customer.first_name }}", "account_number": "{{ customer.account_id }}" }}You can combine both in the same request:
{ "attrs": { "persona": "{{ customer.persona }}", "plan": "{{ customer.plan_type }}" }, "fields": { "first_name": "{{ customer.first_name }}" }}In this example, JustAI uses persona and plan to select the best variant, then hydrates first_name into the returned content.
For more details, see the Customer.io docs on Webhook Actions and Liquid personalization.
Advanced
Section titled “Advanced”Custom events
Section titled “Custom events”Customer.io conversion metrics are tied to a campaign. If you need additional metrics, you can send custom events to JustAI for correlation with message sends within a time window.
Options:
- Daily batch ingestion via S3 (write data to a shared S3 bucket).
- Streaming ingestion via a JustAI events webhook API (similar shape to the Customer.io webhook endpoint above).
Please reach out to our team if you need to add custom events and we can help you integrate them.
Export JustAI data to your warehouse
Section titled “Export JustAI data to your warehouse”JustAI can export a record of which content each user received in your JustAI-integrated Customer.io campaigns, so your data team can analyze results in your own warehouse. The easiest strategy is a daily data export to a shared S3 bucket on your AWS account.
Example data payload
Section titled “Example data payload”Each record reflects one JustAI API call, with a user ID and a tracking ID that uniquely identifies an email/notification in Customer.io.
{ "event_timestamp": <unix_timestamp>, "user_id": <string>, // Customer.io "tracking_id": <string>, // Customer.io "copy_id": <uuid_string>, // JustAI "template_id": <string>, // JustAI // Record of strings, but depends on the template "vars": { "subject": <string>, "preheader": <string>, "body": <string> }, // Record of strings, but depends on the template "attrs": { "persona": <string>, "age": <string> }}In JustAI, each variant has a UUID (copy_id) and a template ID. A template ID corresponds 1:1 with an email / push / etc within a Customer.io campaign, but there can be many variants per template.
The journey ID & action ID uniquely identifies an instance of an email / push / etc and is generated by Customer.io. In our dashboards, we’ll be aggregating the engagement metrics produced by Customer.io but grouped by copy_id and date to see the performance of each variant over time.
Implementation
Section titled “Implementation”This is just a default, and there may be other preferred approaches (direct to Snowflake, etc).
- JustAI to provision an ARN role that will read/write to the shared AWS bucket.
- Client to create bucket or path in existing bucket and grant read/write access to the role (1)
- JustAI to export a backfill of data & to set up a daily export for new records.
- Client to transfer data from S3 into Snowflake (for example).
Implementation details
Section titled “Implementation details”This is just a default, and there may be other preferred approaches (Avro, etc.).
- The exported data to be in Parquet and written to a partitioned path like ”…/YYYY/MM/DD/HH”
- Backfills to be run adhoc & would overwrite any existing data.
- The copy variables can be modified in the frontend, so the UUID => vars could be different. It’s generally the case that we will not modify them once they are being served unless there is a typo / etc.
- The copy metadata could be set up as a separate table rather than flattening them if that is easier for downstream analysis / better storage.
- Retention can be handled as a bucket policy.
Troubleshooting
Section titled “Troubleshooting”- Webhook never fires — confirm the Reporting Webhook is enabled in Customer.io and the endpoint is correct (including
<org_slug>). - No events arriving — confirm you selected the relevant events and that you are sending emails/triggering events in the correct workspace.
- Credentials issues — re-check which Customer.io workspace you created the API key in, and that the same workspace is selected in JustAI.
{{ response.copy | json }}renders blank — confirm your workspace is on the upgraded Customer.io Liquid version. Older Liquid versions silently ignore thejsonfilter.- Message renders blank values — the attribute scope in JustAI must match how you configured the Response tab in Customer.io. If JustAI generates
journey.jw_*Liquid but you stored the response as a customer attribute (or vice versa), the values come back blank. - Webhook response rejected as too large — you shouldn’t hit this on email templates: JustAI omits the HTML body from the response and syncs it into the Customer.io email instead (see Large HTML emails). If it still happens, the usual causes are another oversized variable (a large HTML or
jsonvariable) or"trace": trueleft in the webhook body, which adds debug data to the response. Removetracefrom production webhook calls. - Email body reverted after I edited it in Customer.io — expected. JustAI overwrites the managed email on every save/rollout/ship. Make the change in your JustAI variants.
- Body doesn’t sync to Customer.io — confirm the
bodyvariable’s type is HTML and that Integration Settings has a Treatment Action ID or Design Studio Email ID. Also check the treatment action is an email action; JustAI skips other action types.