
Tutorial: Create Your First Template
This tutorial walks you through creating a new template end-to-end. By the end, you’ll have a fully configured template ready for variant generation and experimentation.
Before you start
Section titled “Before you start”- You need at least one integration set up (e.g., Customer.io, Braze, Iterable).
- Make sure you know which ESP touchpoint (email, push, SMS) you want to optimize.
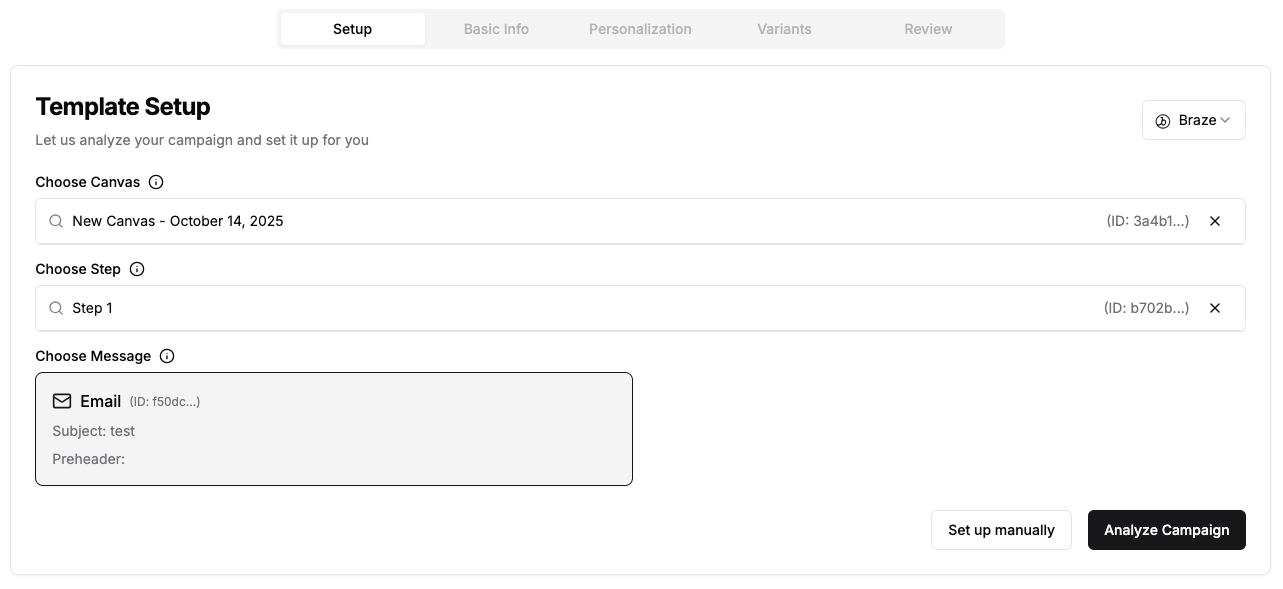
Step 1: Start a new template
Section titled “Step 1: Start a new template”From the Home or Templates page, click + New Template (or go directly to https://console.justwords.ai/new).
- Select your ESP from the dropdown in the upper right corner.
- In the Choose Canvas field, start typing the name or ID of the touchpoint you want to optimize.
- Depending on your ESP, you may need to select further targeting details (e.g., a specific message) — the UI will guide you.
- Click Analyze Campaign.
Step 2: Fill in basic info
Section titled “Step 2: Fill in basic info”JustAI scans your touchpoint and prefills data. Review and add detail where it’s missing:
| Field | What to enter |
|---|---|
| Name | Something recognizable — often the same as your ESP touchpoint name |
| Description | Tell the AI what this campaign does and what you’re optimizing for. Be specific. |
| Brand and Tone | Describe your brand voice. This combines with your org-level settings. |
| Key Metric | The metric that defines success — e.g., open rate, click rate, conversion. Configure available metrics in Org Settings. |
Click Next when ready.
Step 3: Configure personalization
Section titled “Step 3: Configure personalization”This step defines what the AI can work with when generating variants.
- Variables: The parts of the message you want to optimize (e.g.,
subject,preheader,body). Prepopulated from your touchpoint, but editable. - Fields: Templated values that appear in copy (e.g.,
{{ firstName }}). - Attributes: Audience segments that determine which variant a user sees (e.g.,
subscription_tier). Set these up in Org Settings. - Themes: Optional tags that guide the tone/approach of generated variants (e.g.,
urgency,friendly). Configure org defaults in Org Settings.
Example
Section titled “Example”For a welcome email to new users, you might configure:
| Setting | Values |
|---|---|
| Variables | subject, preheader, body |
| Fields | firstName |
| Attributes | subscriptionTier |
| Themes | urgency, calm, persuasive |
Step 4: Set your control variant
Section titled “Step 4: Set your control variant”Based on the variables from the previous step, define your control — the baseline copy. Typically this matches what’s currently live in your ESP.
If a user doesn’t qualify for any variant (or falls into the control bucket), this is what they’ll see.
Step 5: Review and save
Section titled “Step 5: Review and save”Double-check everything on the review screen, then click Save Template.
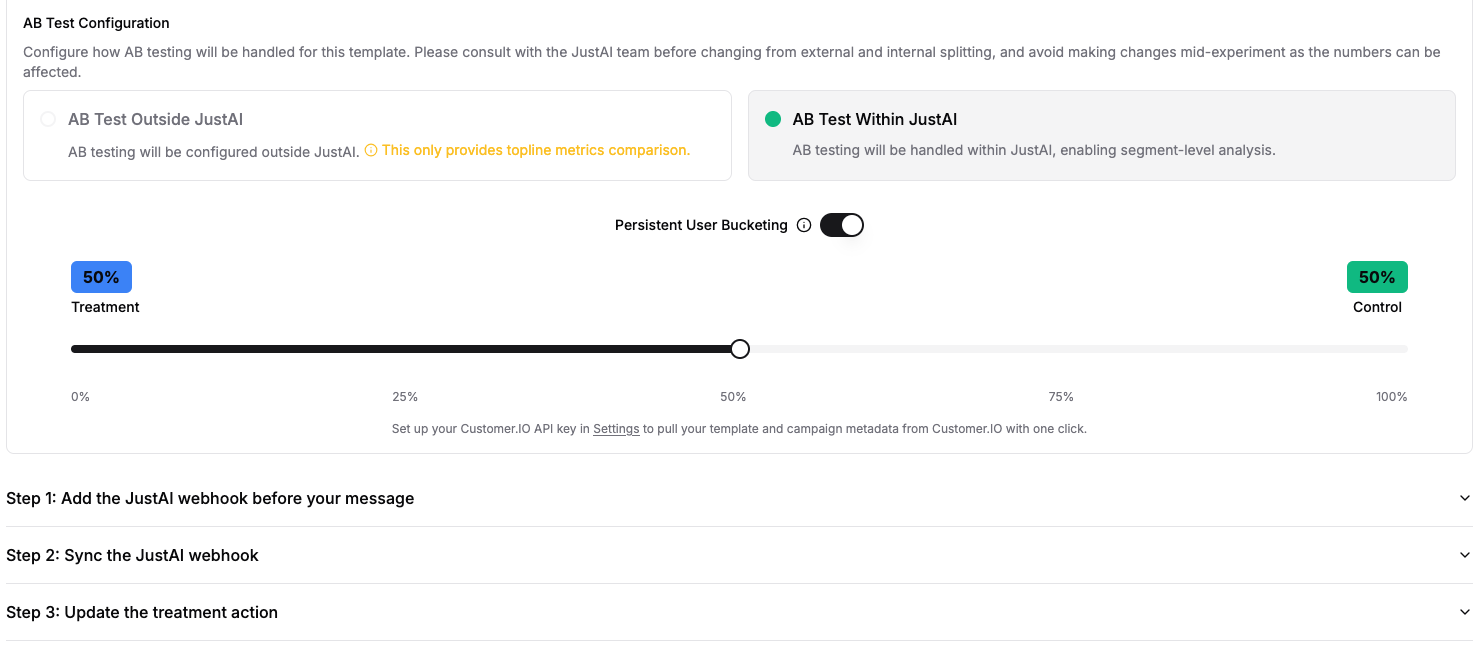
Step 6: Configure experimentation
Section titled “Step 6: Configure experimentation”After saving, go to Configure → Integration for your template.
We recommend:
- Internal Experimentation — lets JustAI handle traffic splitting with full metrics comparison and continuous experimentation.
- Persistent User Bucketing — ensures users always see the same variant.
Follow the inline steps for your specific ESP.
What’s next
Section titled “What’s next”Your template is ready. Head to the next tutorial to start generating variants:
- Generate & Refine Variants
- Prompting Guide — write better prompts for higher-quality variants